Docker 環境の構築 ( Ubuntu 版 )
こちらの記事は古くなりました。
最新の記事をご参照下さい。
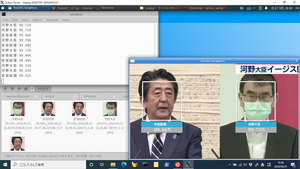
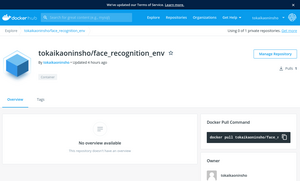
Docker Image (GPU版)
Docker Image (CPU版)
Docker Imageのダウンロード方法
Face01 シリーズでの Docker ご提供について最低限お客様の PC に Docker がインストールされていなくてはなりません。今回の Docker 環境構築のホスト OS は Ubuntu 18.04 です。
Docker とは何か、その概念と使い方について参考リンクを以下に記載します。Docker に全く触れてこられなかった方はまずこちらからご参照ください。
- 入門 Docker
- Docker & Kubernetes入門 – (1) 概要編
- Kubernetesのセキュリティについて整理してみた件
- Dockerコンテナ:オープンソース ライセンスの考慮事項は何か
目次
Ubuntu 18.04 ( Bionic Beaver ) へインストール
Ubuntu 20.04 においても環境構築のやり方は同じです。Ubuntu 14.10 の様に古いホスト OS ですと若干違いますので原典をご参照ください。
原典
原典とは常にリファレンスとして活用する公式チュートリアルです。
原典はこちら「 Install Docker Engine on Ubuntu 」
原典の和訳はこちら「Docker ドキュメント日本語化プロジェクト」ただし内容の古い箇所がありますのでなるべく原典をあたってください。
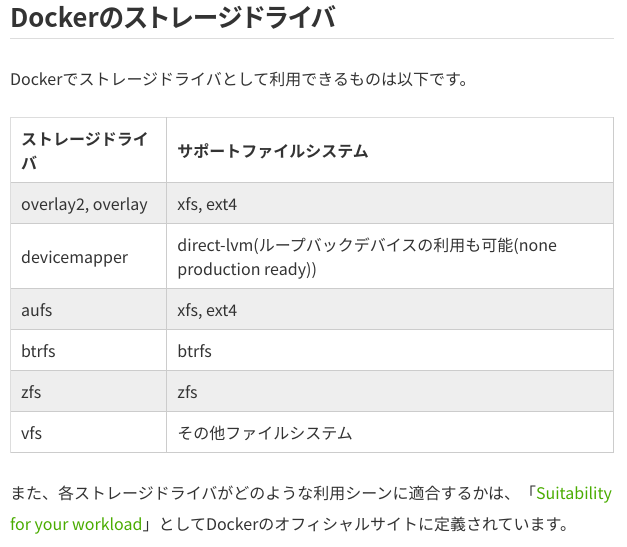
ストレージドライバ
こちらは読み飛ばして頂いて結構です。ご興味があればお読みください。
Docker エンジンが使用するストレージドライバ ( overlay2 等 ) について詳しく扱っているサイトはこちら「Dockerのストレージドライバを理解する」
Docker のインストール
インストール方法はいくつかありますが、ここではリポジトリの追加を選択します。
## リファレンスではapt-getを使っているのですがaptで置き換え可能です
$ sudo apt-get update

$ sudo apt-get install \
    apt-transport-https \
    ca-certificates \
    curl \
    gnupg-agent \
    software-properties-common
$ curl -fsSL https://download.docker.com/linux/ubuntu/gpg | sudo apt-key add -
$ sudo apt-key fingerprint 0EBFCD88

pub   rsa4096 2017-02-22 [SCEA]
      9DC8 5822 9FC7 DD38 854A  E2D8 8D81 803C 0EBF CD88
uid           [ unknown] Docker Release (CE deb) <docker@docker.com>
sub   rsa4096 2017-02-22 [S]


$ sudo add-apt-repository \
   "deb [arch=amd64] https://download.docker.com/linux/ubuntu \
   $(lsb_release -cs) \
   stable"
$ sudo apt-get update
$ sudo apt-get install docker-ce docker-ce-cli containerd.io
インストールできたかの確認
$ sudo docker run hello-world
Unable to find image 'hello-world:latest' locally
latest: Pulling from library/hello-world
0e03bdcc26d7: Pull complete
Digest: sha256:4cf9c47f86df71d48364001ede3a4fcd85ae80ce02ebad74156906caff5378bc
Status: Downloaded newer image for hello-world:latest

Hello from Docker!
This message shows that your installation appears to be working correctly.

To generate this message, Docker took the following steps:
 1. The Docker client contacted the Docker daemon.
 2. The Docker daemon pulled the "hello-world" image from the Docker Hub.
    (amd64)
 3. The Docker daemon created a new container from that image which runs the
    executable that produces the output you are currently reading.
 4. The Docker daemon streamed that output to the Docker client, which sent it
    to your terminal.

To try something more ambitious, you can run an Ubuntu container with:
 $ docker run -it ubuntu bash

Share images, automate workflows, and more with a free Docker ID:
 https://hub.docker.com/

For more examples and ideas, visit:
 https://docs.docker.com/get-started/
インストールが終わったら
root 権限で動いていますのでグループ変更などの操作をします。
原典ではこちらです「 Post-installation steps for Linux 」
原典の warning で書かれているとおり、docker グループを特権ユーザとして扱うことによるセキュリティについてはこちらをご覧ください「 Docker Daemon Attack Surface. 」
また実験的ですが root 権限を使わずに Docker を動かせる方法はこちら「 Run the Docker daemon as a non-root user (Rootless mode). 」
docker グループを作ってそのユーザになります。
$ sudo groupadd docker
groupadd: グループ 'docker' は既に存在します
$ sudo usermod -aG docker $USER
一度ログアウトします。
「Linuxでは、次のコマンドを実行して、グループへの変更をアクティブ化することもできます。」
次のようにすれば管理者権限無しで docker コマンドが使えます。
$ newgrp docker
$ docker run hello-world

Hello from Docker!
This message shows that your installation appears to be working correctly.

To generate this message, Docker took the following steps:
 1. The Docker client contacted the Docker daemon.
 2. The Docker daemon pulled the "hello-world" image from the Docker Hub.
    (amd64)
 3. The Docker daemon created a new container from that image which runs the
    executable that produces the output you are currently reading.
 4. The Docker daemon streamed that output to the Docker client, which sent it
    to your terminal.

To try something more ambitious, you can run an Ubuntu container with:
 $ docker run -it ubuntu bash

Share images, automate workflows, and more with a free Docker ID:
 https://hub.docker.com/

For more examples and ideas, visit:
 https://docs.docker.com/get-started/
もしこの段階で以下のようなエラーが出たら
WARNING: Error loading config file: /home/user/.docker/config.json -
stat /home/user/.docker/config.json: permission denied
〜/ .docker /ディレクトリを削除するか(自動的に再作成されますが、カスタム設定はすべて失われます)、次のコマンドを使用して所有権とアクセス許可を変更します。
$ sudo chown "$USER":"$USER" /home/"$USER"/.docker -R
$ sudo chmod g+rwx "$HOME/.docker" -R
PC を起動したら Docker を起動する
大抵のディストリビューションでしたら systemd を使ってますがもし Ubuntu 14.10 などは upstart を使います。
$ sudo systemctl enable docker
[sudo] terms のパスワード:
Synchronizing state of docker.service with SysV service script with /lib/systemd/systemd-sysv-install.
Executing: /lib/systemd/systemd-sysv-install enable docker
逆をやりたいなら
$ sudo systemctl disable docker溜まっていくログ
Docker は一連のログドライバーを介してホスト上で実行されているすべてのコンテナーからログデータを収集および表示する機能を提供します。( View logs for a container or service ) デフォルトのログドライバーである json-file は、ホストファイルシステム上の JSON 形式のファイルにログデータを書き込みます。時間の経過とともに、これらのログファイルのサイズが拡大し、ディスクリソースが使い果たされる可能性があります。 このような問題を軽減するには、Splunk や Syslog などの代替ログドライバーを構成するか、デフォルトドライバーのログローテーションを設定します。原典ではこの部分です。
Docker-compose のインストール
複数のコンテナを使う場合 Docker-compose が必要になります。インストールしておきましょう。
$ sudo apt install docker-compose
以下の追加パッケージがインストールされます:
  golang-docker-credential-helpers python-asn1crypto python-backports.ssl-match-hostname python-cached-property python-certifi python-cffi-backend
  python-cryptography python-docker python-dockerpty python-dockerpycreds python-docopt python-enum34 python-funcsigs python-functools32 python-idna
  python-ipaddress python-jsonschema python-mock python-openssl python-pbr python-requests python-texttable python-urllib3 python-websocket python-yaml
Docker のバージョン他
$ docker --version
Docker version 19.03.13, build 4484c46d9d
$ docker image ls
REPOSITORY TAG IMAGE ID CREATED SIZE
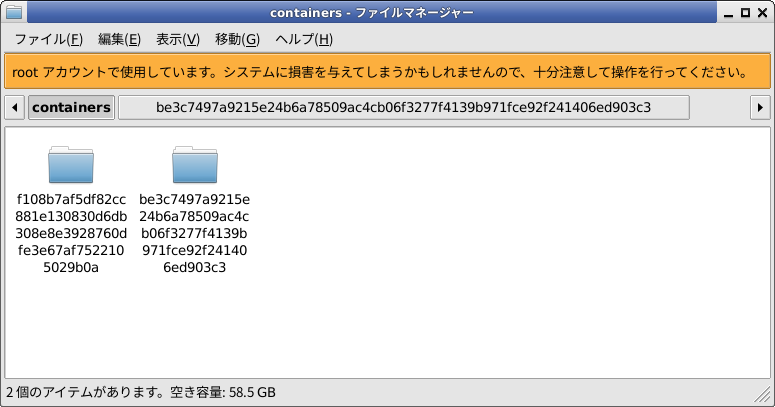
hello-world latest bf756fb1ae65 9 months ago 13.3kB$ docker ps --all
CONTAINER ID IMAGE COMMAND CREATED STATUS PORTS NAMES
f108b7af5df8 hello-world "/hello" 29 minutes ago Exited (0) 29 minutes ago compassionate_antonelli
be3c7497a921 hello-world "/hello" 5 hours ago Exited (0) 5 hours ago youthful_ramanujan
一度 $ docker info でどこにインストールされているのかや今の状態を確認しておくと良いと思います。内容はインストールした方の PC 毎に違います。
$ docker info
Client:
Debug Mode: false
Server:
Containers: 2
Running: 0
Paused: 0
Stopped: 2
Images: 1
Server Version: 19.03.13
Storage Driver: overlay2
Backing Filesystem: extfs
Supports d_type: true
Native Overlay Diff: true
Logging Driver: json-file
Cgroup Driver: cgroupfs
Plugins:
Volume: local
Network: bridge host ipvlan macvlan null overlay
Log: awslogs fluentd gcplogs gelf journald json-file local logentries splunk syslog
Swarm: inactive
Runtimes: runc
Default Runtime: runc
Init Binary: docker-init
containerd version: 8fba4e9a7d01810a393d5d25a3621dc101981175
runc version: dc9208a3303feef5b3839f4323d9beb36df0a9dd
init version: fec3683
Security Options:
apparmor
seccomp
Profile: default
Kernel Version: 5.4.0-48-generic
Operating System: Ubuntu 18.04.5 LTS
OSType: linux
Architecture: x86_64
CPUs: 8
Total Memory: 15.63GiB
Name: terms-Desk
ID: YZJE:TIKG:H3RM:ZX55:UC6M:6EBL:EV6K:73G3:KPTB:FGOV:KMWI:4Y5K
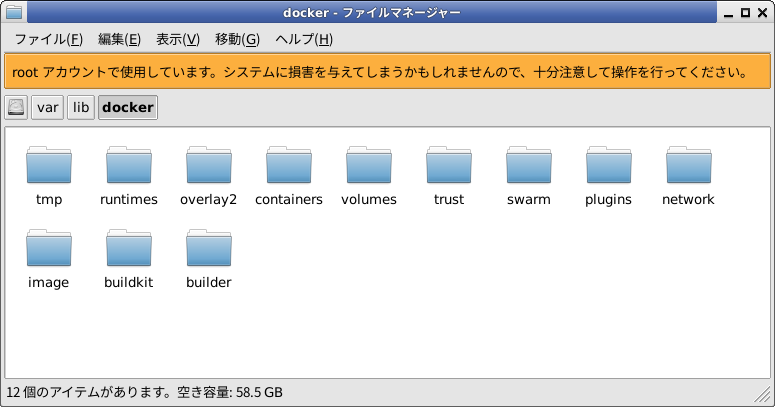
Docker Root Dir: /var/lib/docker
Debug Mode: false
Registry: https://index.docker.io/v1/
Labels:
Experimental: false
Insecure Registries:
127.0.0.0/8
Live Restore Enabled: false
WARNING: No swap limit support$ docker info から Docker ディレクトリが分かりますので興味があれば覗いてみましょう。
上記の状態で $ docker ps -a を試すと以下になります。
$ docker ps -a
CONTAINER ID        IMAGE               COMMAND             CREATED             STATUS                    PORTS               NAMES
f108b7af5df8        hello-world         "/hello"            19 hours ago        Exited (0) 19 hours ago                       compassionate_antonelli
be3c7497a921        hello-world         "/hello"            24 hours ago        Exited (0) 24 hours ago                       youthful_ramanujan
もう一度 hello-world を動かしてみましょう。
$ docker run hello-world

Hello from Docker!
This message shows that your installation appears to be working correctly.

To generate this message, Docker took the following steps:
 1. The Docker client contacted the Docker daemon.
 2. The Docker daemon pulled the "hello-world" image from the Docker Hub.
    (amd64)
 3. The Docker daemon created a new container from that image which runs the
    executable that produces the output you are currently reading.
 4. The Docker daemon streamed that output to the Docker client, which sent it
    to your terminal.

To try something more ambitious, you can run an Ubuntu container with:
 $ docker run -it ubuntu bash

Share images, automate workflows, and more with a free Docker ID:
 https://hub.docker.com/

For more examples and ideas, visit:
 https://docs.docker.com/get-started/
きちんと動いてくれました。
CLI のリファレンスは以下の通りです。
一度 $ docker -h でヘルプも見ておくと良いと思います。
以上です。これで decker を使う準備が整いました。
最後までお読みいただきありがとうございました。