スマホの画面注視認識機能を簡易実装する

はじめに
寝顔でスマホの顔認証ロックを解除 50万円の不正送金被害も どう防ぐ?専門家に聞いたというニュースがあり驚きました。悪い人はいろんなこと考えるんですね。
あなたの個人情報や資産に関する情報などが詰まったスマートフォン。普段はロックをかけているが、もし寝ている間にロックが解除されてしまったら?
そんな恐ろしい事件が実際に起きた。警視庁は、飲食店で知り合った男性が寝た後に、男性の寝顔でスマホやネットバンキングの顔認証ロックを解除し、不正に50万円を送金した疑いで、チュニジア人の男を逮捕したのだ。9/14(木) 15:54配信
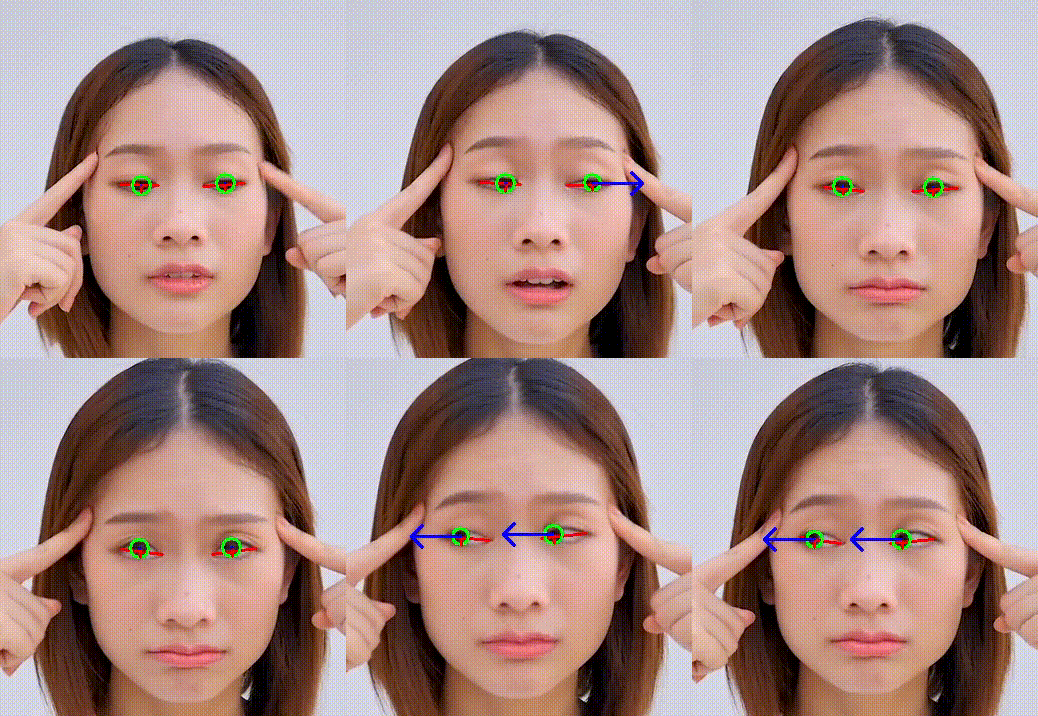
このニュースで出てきた「画面注視認識機能」。要は、スマホの画面を見ているかどうかを認識する機能です。これを簡易的に実装してみました。
考え方
カメラを注視している、ということは、虹彩が目の中心か、あるいは寄り目ぎみになっているということです。
虹彩の位置を確認するにはmediapipeを使えばできそうですね。
目の左端から右端にかけて1本の線を引き、その線の中心に虹彩があるかどうかを確認します。
入力動画

- Pixabay
- Piyapong Saydaung
参考
Kazuhito00様のmediapipe-python-sampleを参考にさせていただきました。
それ以外の参考にしたサイトを以下に記載します。
- mediapipe/iris.md
- mediapipe/facemesh.md
- Real-time Pupil Tracking from Monocular Video for Digital Puppetry
- MediaPipe Iris: Real-time Iris Tracking & Depth Estimation
- Face landmark detection guide
- mediapipe/canonical_face_model_uv_visualization.png
実装
"""
copyright: yKesamaru
"""

import sys

sys.path.append('/usr/lib/python3/dist-packages')
import copy

import cv2 as cv
import mediapipe as mp
import numpy as np

# ビデオファイルの初期化
cap = cv.VideoCapture('assets/iris.mp4')

# FPSを取得
fps = int(cap.get(cv.CAP_PROP_FPS))

# 矢印の描画パラメータ
arrow_length = 50
arrow_color = (0, 255, 0)  # 矢印の色を設定(BGR形式)

# モデルロード
mp_face_mesh = mp.solutions.face_mesh
face_mesh = mp_face_mesh.FaceMesh(
    max_num_faces=1,
    refine_landmarks=True,
    min_detection_confidence=0.7,
    min_tracking_confidence=0.5,
)

def calc_min_enc_losingCircle(landmark_list):
    """
    与えられたランドマークのリストに基づいて、最小の外接円を計算します。

    Parameters:
    - landmark_list (list of tuple): ランドマークの座標を含むリスト。各ランドマークは(x, y)の形式のタプルです。

    Returns:
    - tuple: 外接円の中心と半径を表すタプル。中心は(x, y)の形式のタプル、半径は整数です。
    """
    center, radius = cv.minEnclosingCircle(np.array(landmark_list))
    center = (int(center[0]), int(center[1]))
    radius = int(radius)
    return center, radius

def calc_iris_min_enc_losingCircle(image, landmarks):
    """
    画像上の左目と右目の虹彩の外接円の中心と半径を計算する関数。

    Parameters:
    - image (numpy.ndarray): 虹彩の外接円を計算する対象の画像。
    - landmarks (mediapipe.framework.formats.landmark_pb2.NormalizedLandmarkList): 顔のランドマーク情報。

    Returns:
    - left_eye_info (tuple): 左目の虹彩の外接円の中心座標と半径を含むタプル。
    - right_eye_info (tuple): 右目の虹彩の外接円の中心座標と半径を含むタプル。
    """
    image_width, image_height = image.shape[1], image.shape[0]
    landmark_point = []
    for index, landmark in enumerate(landmarks.landmark):
        landmark_x = min(int(landmark.x * image_width), image_width - 1)
        landmark_y = min(int(landmark.y * image_height), image_height - 1)
        landmark_point.append((landmark_x, landmark_y))
    left_eye_points = [
        landmark_point[468],
        landmark_point[469],
        landmark_point[470],
        landmark_point[471],
        landmark_point[472],
    ]
    right_eye_points = [
        landmark_point[473],
        landmark_point[474],
        landmark_point[475],
        landmark_point[476],
        landmark_point[477],
    ]
    left_eye_info = calc_min_enc_losingCircle(left_eye_points)
    right_eye_info = calc_min_enc_losingCircle(right_eye_points)
    return left_eye_info, right_eye_info

def draw_landmarks(image, landmarks, refine_landmarks, left_eye, right_eye):
    """
    画像上に顔のランドマークを描画する関数。

    Parameters:
    - image (numpy.ndarray): 描画対象の画像。
    - landmarks (mediapipe.framework.formats.landmark_pb2.NormalizedLandmarkList): 顔のランドマーク情報。
    - refine_landmarks (bool): 虹彩の外接円と目の輪郭のランドマークを描画するかどうかを指定するフラグ。
    - left_eye (tuple): 左目の虹彩の中心座標と半径を含むタプル。
    - right_eye (tuple): 右目の虹彩の中心座標と半径を含むタプル。

    Returns:
    - image (numpy.ndarray): ランドマークが描画された画像。
    - landmark_point (list): 顔のランドマークの座標リスト。
    """
    image_width, image_height = image.shape[1], image.shape[0]
    landmark_point = []
    for index, landmark in enumerate(landmarks.landmark):
        landmark_x = min(int(landmark.x * image_width), image_width - 1)
        landmark_y = min(int(landmark.y * image_height), image_height - 1)
        landmark_point.append((landmark_x, landmark_y))
    if refine_landmarks:
        # 虹彩の外接円の描画
        cv.circle(image, left_eye[0], left_eye[1], (0, 255, 0), 2)
        cv.circle(image, right_eye[0], right_eye[1], (0, 255, 0), 2)
        # 目の輪郭のランドマークを描画
        left_eye_indices = [468, 469, 470, 471, 472]
        right_eye_indices = [473, 474, 475, 476, 477]
        for idx in left_eye_indices + right_eye_indices:
            cv.circle(image, landmark_point[idx], 1, (0, 255, 0), 1)
    # 左目の左端から右端を結ぶ直線を赤で描画
    cv.line(image, landmark_point[468], landmark_point[472], (0, 0, 255), 2)
    # 右目の左端から右端を結ぶ直線を赤で描画
    cv.line(image, landmark_point[473], landmark_point[477], (0, 0, 255), 2)
    return image, landmark_point

def draw_eye_lines(image, landmarks):
    """
    左目と右目の直線を赤で描画する関数

    Parameters:
    - image: 画像
    - landmarks: 顔のランドマーク

    Returns:
    - image: 直線が描画された画像
    """
    image_width, image_height = image.shape[1], image.shape[0]
    landmark_point = []
    for index, landmark in enumerate(landmarks.landmark):
        landmark_x = min(int(landmark.x * image_width), image_width - 1)
        landmark_y = min(int(landmark.y * image_height), image_height - 1)
        landmark_point.append((landmark_x, landmark_y))
    # 左目の直線を描画
    cv.line(image, landmark_point[33], landmark_point[133], (0, 0, 255), 2)
    # 右目の直線を描画
    cv.line(image, landmark_point[362], landmark_point[359], (0, 0, 255), 2)
    return image

def get_eye_direction(eye_start, eye_end, iris_center):
    """
    目がどちらを向いているかを判断する関数

    Parameters:
    - eye_start: 目の左端の座標
    - eye_end: 目の右端の座標
    - iris_center: 虹彩の中心の座標

    Returns:
    - direction: 'left', 'right', or 'center'
    """
    # 目の水平方向の長さを計算
    eye_width = np.abs(eye_end[0] - eye_start[0])

    # 虹彩の中心が目の水平方向のどの位置にあるかを計算
    relative_position = (iris_center[0] - eye_start[0]) / eye_width

    # 虹彩の位置に基づいて方向を判断
    if relative_position < 0.4:
        return 'left'
    elif relative_position > 0.6:
        return 'right'
    else:
        return 'center'

def draw_gaze_arrow(image, eye_center, iris_center, direction, arrow_length):
    """
    目がどちらを向いているかを示す矢印を描画する関数

    Parameters:
    - image: 画像
    - eye_center: 目の中心の座標
    - iris_center: 虹彩の中心の座標
    - direction: 'left', 'right', or 'center'
    - length: 矢印の長さ

    Returns:
    - image: 矢印が描画された画像
    """
    if direction == 'left':
        end_point = (eye_center[0] - arrow_length, eye_center[1])
    elif direction == 'right':
        end_point = (eye_center[0] + arrow_length, eye_center[1])
    else:  # center
        end_point = iris_center
    cv.arrowedLine(image, eye_center, end_point, (255, 0, 0), 2, tipLength=0.3)
    return image

if __name__ == '__main__':
    while True:
        ret, image = cap.read()
        if not ret:
            break
        debug_image = copy.deepcopy(image)
        image_width, image_height = image.shape[1], image.shape[0]

        # 検出実施
        image_rgb = cv.cvtColor(image, cv.COLOR_BGR2RGB)
        results = face_mesh.process(image_rgb)

        # 描画
        if results.multi_face_landmarks is not None:
            for face_landmarks in results.multi_face_landmarks:
                # 直線を描画
                debug_image = draw_eye_lines(debug_image, face_landmarks)
                # 虹彩の外接円の計算
                left_eye, right_eye = None, None
                left_eye, right_eye = calc_iris_min_enc_losingCircle(
                    debug_image,
                    face_landmarks,
                )
                # 描画
                debug_image, landmark_point = draw_landmarks(  # landmark_point を受け取る
                    debug_image,
                    face_landmarks,
                    True,
                    left_eye,
                    right_eye,
                )
                # 虹彩の中心と目の中心を使用して、見ている方向の矢印を描画
                left_eye_center = (int(face_landmarks.landmark[468].x * image_width), int(face_landmarks.landmark[468].y * image_height))
                right_eye_center = (int(face_landmarks.landmark[473].x * image_width), int(face_landmarks.landmark[473].y * image_height))
                # 虹彩の中心と目の中心を使用して、見ている方向を取得
                left_eye_direction = get_eye_direction(landmark_point[130], landmark_point[244], left_eye[0])
                right_eye_direction = get_eye_direction(landmark_point[463], landmark_point[359], right_eye[0])
                # 虹彩の中心と目の中心を使用して、見ている方向の矢印を描画
                debug_image = draw_gaze_arrow(debug_image, left_eye_center, left_eye[0], left_eye_direction, arrow_length)
                debug_image = draw_gaze_arrow(debug_image, right_eye_center, right_eye[0], right_eye_direction, arrow_length)
                print(f"Left Eye is looking: {left_eye_direction}")
                print(f"Right Eye is looking: {right_eye_direction}")
        cv.imshow('MediaPipe Face Mesh Demo', debug_image)
        # キー処理(ESC:終了)
        wait_time = int(1000 / fps)
        key = cv.waitKey(wait_time)
        if key == 27:  # ESC
            break
    cap.release()
    cv.destroyAllWindows()
出力動画

Right Eye is looking: center
Left Eye is looking: center
Right Eye is looking: center
Left Eye is looking: left
Right Eye is looking: left
Left Eye is looking: left
Right Eye is looking: left
Left Eye is looking: left
(前後省略)
この機能を使えば、画面の指示に従い虹彩を動かすことによって、マルチモーダルな認証を実現できるかもしれませんね。


