実行環境構築 Ubuntu20.04以降
Ubuntu20.04以降におけるFACE01の実行環境の構築を解説します。手順を踏めばとても簡単です。
最新情報を確認する
FACE01_SAMPLE (GitHub)のREADME.mdを確認して下さい。
一括インストール
INSTALL_FACE01.shを利用する
wget https://raw.githubusercontent.com/yKesamaru/FACE01_SAMPLE/master/INSTALL_FACE01.sh
chmod +x INSTALL_FACE01.sh
bash -c ./INSTALL_FACE01.sh
以上でインストールは終了です。簡単ですね!
Dockerを利用したい場合
To install Dockerを参照し、最新情報を確認して下さい。
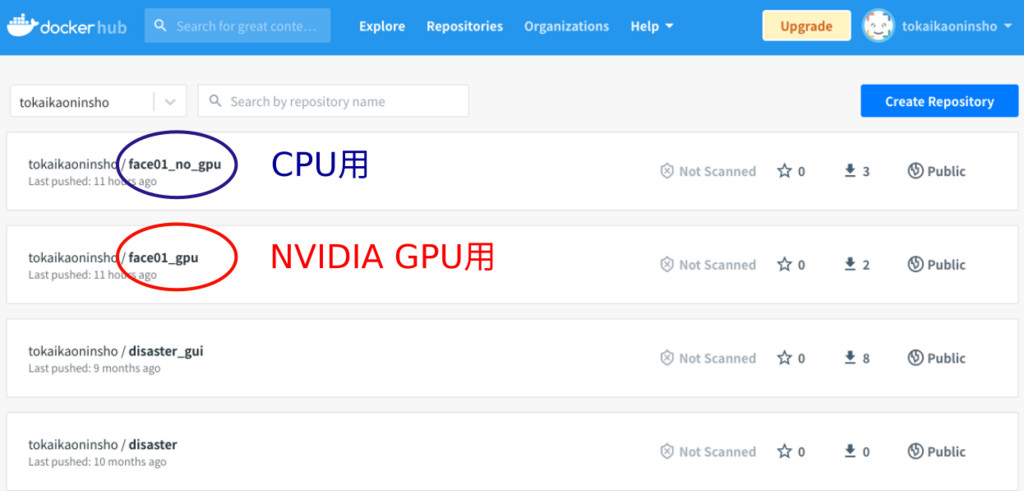
Docker Imageは2種類あります。
- NVIDIA GPUを利用する場合
face01_gpuを選択する
- NVIDIA GPUを利用できない場合
face01_no_gpuを選択する
Docker Imageをダウンロードする
https://hub.docker.com/u/tokaikaoninsho
上記サイトからDocker Imageをダウンロードします。
NVIDIA GPUを使用する場合
NVIDIAドライバー、cuDNNやcuBLASなどのライブラリが正常にインストールされていることが前提条件となります。インストールが済んでいない場合はGPU導入を参照して下さい。
nvidia-dockerがインストールされていることを確認して下さい。
docker run --gpus all --rm nvidia/cuda nvidia-smiNVIDIA GPU サポートを Docker に追加するには、NVIDIA Container Toolkit をインストールします。 nvidia-container-runtime は Linux でのみ使用できます。 https://www.tensorflow.org/install/docker#gpu_support [ja] を参照してください)
# Download Docker Image
docker pull tokaikaoninsho/face01_gpu:1.4.10

# Check `REPOSITORY`, `TAG`, and `IMAGE ID` of the downloaded Docker Image. (IMPORTANT!)
docker images

# Run Docker
docker run --rm -it \
  --gpus all -e DISPLAY=$DISPLAY \
  -v /tmp/.X11-unix/:/tmp/.X11-unix: tokaikaoninsho/face01_gpu:1.4.10
上記コマンドに失敗した場合は、以下のコマンドを使用して下さい。
docker run --rm -it \
  --gpus all -e DISPLAY=$DISPLAY \
  --device /dev/video0:/dev/video0:mwr \
  -v /tmp/.X11-unix/:/tmp/.X11-unix: tokaikaoninsho/face01_gpu:1.4.10
Python仮想環境をアクティベートする
# Activate venv (IMPORTANT!)
. bin/activate
サンプルコードでテストをする
python example/simple.py正常に動作したら、インストール終了です。
NVIDIA GPUを使用しない場合
# Download Docker Image
docker pull tokaikaoninsho/face01_no_gpu:1.4.10

# Check `REPOSITORY`, `TAG`, and `IMAGE ID` of the downloaded Docker Image. (IMPORTANT!)
docker images

# Run Docker
docker run --rm -it -v /tmp/.X11-unix/:/tmp/.X11-unix: tokaikaoninsho/face01_no_gpu:1.4.10
上記コマンドに失敗した場合は、以下のコマンドを使用して下さい。
docker run --rm -it \
  -e DISPLAY=$DISPLAY \
  --device /dev/video0:/dev/video0:mwr \
  -v /tmp/.X11-unix/:/tmp/.X11-unix: tokaikaoninsho/face01_no_gpu:1.4.10
Python仮想環境をアクティベートする
# Activate venv (IMPORTANT!)
. bin/activate
サンプルコードでテストをする
python example/simple.py正常に動作したら、インストール終了です。
手動で個別インストールしたい場合
update
OS全体のアップデートを済ませて下さい。
$ sudo apt update
$ sudo apt upgrade -y
Fontの確認
FACE01 GRAPHICSでは「mplus-1mn-regular.ttf」フォントを指定しています。
こちらからダウンロードしてください。Synaptic ( パッケージ管理ソフトウェア ) からインストールする場合は「fonts-mplus」で検索してください。
インストールできたかの確認は
$ fc-list | grep mplus-1mn-regular.ttfで確認できます。

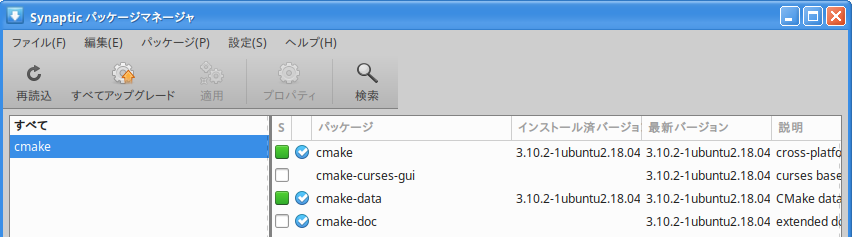
Synaptic では以下のようになります。

CMakeのインストール
環境を整えるために、まず「CMake」をインストールします。
$ sudo apt install cmakeUbuntu の場合は Windows と違いパッケージマネージャからのインストールも可能です。
tkinterのインストール
最初からtkinterはインストールされているとよく目にしますが実際Ubuntu18.04系には未インストールです。インストールしましょう。
$ sudo apt install python3-tkffmpegのインストール
ライブラリopencv-pythonに必要です。
$ sudo apt install ffmpegopencvのインストール
opencvのインストールは注意して行ってください。パッケージからインストールするのかpipからインストールするのかを選んでください。両方をインストールしてしまうと思わぬアクシデントが起こる可能性があります。
ここではパッケージマネージャを使用してインストールする例を記載します。
$ sudo apt install python3-opencvコーデックのインストール
必要な場合のみ行ってください。
$ sudo apt install libavcodec-dev libavformat-dev libswscale-dev参考URL: Install OpenCV-Python in Ubuntu
Python仮想環境の構築
以下のようにしてPython仮想環境を構築します。ここではpyenvとvenvを使用します。
pyenvのインストール
pyenvのインストールは必須ではありません。不必要な方は次の「venv仮想環境作成」まで進んで下さい。
pyenvはシステム環境保護や切り分けのしやすさからインストールしますがそれ以外にもopencv-pythonというライブラリがトラブルを起こした時にPythonのバージョンを切り替えやすいようにする目的もあります。
$ sudo apt install -y gcc make build-essential libssl-dev libffi-dev zlib1g-dev libbz2-dev libreadline-dev libsqlite3-dev wget curl llvm libncurses5-dev xz-utils tk-dev libxml2-dev libxmlsec1-dev liblzma-dev.bash_profileに以下を追記します
export PYENV_ROOT="$HOME/.pyenv"
export PATH="$PYENV_ROOT/bin:$PATH"
if command -v pyenv 1>/dev/null 2>&1; then
  eval "$(pyenv init -)"
fi
.bash_profileの再読込とgit cloneを行います。
# pyenvのダウンロード
$ git clone https://github.com/pyenv/pyenv.git ~/.pyenv
Cloning into '/home/terms/.pyenv'...
remote: Enumerating objects: 20109, done.
remote: Counting objects: 100% (1021/1021), done.
remote: Compressing objects: 100% (457/457), done.
remote: Total 20109 (delta 627), reused 773 (delta 487), pack-reused 19088
Receiving objects: 100% (20109/20109), 4.10 MiB | 1.89 MiB/s, done.
Resolving deltas: 100% (13562/13562), done.

# .bash_profileの再読込
$ source .bash_profile
venv仮想環境作成
# Ubuntu版
## venv仮想環境作成
$ python3 -m venv./  # 好きなディレクトリ名に
## 仮想環境に入る
$ source ./bin/activate
## pipアップデート
$ pip install -U pip
続いてライブラリのインストールを行います。
## ライブラリの確認
$ pip freeze
## ライブラリの一括インストール
$ pip install -r requirements.txt
## ライブラリの確認
$ pip freeze
requirements.txtの中身は以下になります。
dlib
face-recognition
face-recognition-models
numpy
opencv-python
Pillow
PySimpleGUI
GPU対応しているか確認します
$ python3
Python 3.6.9 (default, Jan 26 2021, 15:33:00)
[GCC 8.4.0] on linux
Type "help", "copyright", "credits" or "license" for more information.
>>> import dlib
>>> dlib.DLIB_USE_CUDA
True
>>>
Trueになるのを確認して下さい。
pyenvからvenv、Python実行環境作成からライブラリインストールまで
以下の様な流れになります。
# コマンドの確認
user@user:~/venv$ pyenv
pyenv 2.0.4-5-gab1a9d29
Usage: pyenv <command> [<args>]

Some useful pyenv commands are:
   --version   Display the version of pyenv
   commands    List all available pyenv commands
   exec        Run an executable with the selected Python version
   global      Set or show the global Python version(s)
   help        Display help for a command
   hooks       List hook scripts for a given pyenv command
   init        Configure the shell environment for pyenv
   install     Install a Python version using python-build
   local       Set or show the local application-specific Python version(s)
   prefix      Display prefix for a Python version
   rehash      Rehash pyenv shims (run this after installing executables)
   root        Display the root directory where versions and shims are kept
   shell       Set or show the shell-specific Python version
   shims       List existing pyenv shims
   uninstall   Uninstall a specific Python version
   version     Show the current Python version(s) and its origin
   version-file   Detect the file that sets the current pyenv version
   version-name   Show the current Python version
   version-origin   Explain how the current Python version is set
   versions    List all Python versions available to pyenv
   whence      List all Python versions that contain the given executable
   which       Display the full path to an executable

See `pyenv help <command>' for information on a specific command.
For full documentation, see: https://github.com/pyenv/pyenv#readme

# インストールされているバージョンを確認
user@user:~/venv$ pyenv versions
* system (set by user@user:~/.python-version)
  3.9.6

# ローカル設定
user@user:~/venv$ pyenv local 3.9.6
user@user:~/venv$ pyenv versions
  system
* 3.9.6 (set by user@user:~/venv/.python-version)

# 現在のバージョン確認
user@user:~/venv$ python -V
Python 3.9.6

# 仮想環境を作成
user@user:~/venv$ python -m venv ./

# 仮想環境に入る
user@user:~/venv$ source ./bin/activate

# pipのアップデート
(venv) user@user:~/venv$ pip -V
pip 21.1.3 from user@user:~/venv/lib/python3.9/site-packages/pip (python 3.9)
(venv) user@user:~/venv$ pip install -U pip
Requirement already satisfied: pip in ./lib/python3.9/site-packages (21.1.3)
Collecting pip
  Using cached pip-21.2.4-py3-none-any.whl (1.6 MB)
Installing collected packages: pip
  Attempting uninstall: pip
    Found existing installation: pip 21.1.3
    Uninstalling pip-21.1.3:
      Successfully uninstalled pip-21.1.3
Successfully installed pip-21.2.4

# ライブラリの一括インストール
## !注意! パッケージマネージャを用いたopencvをインストールしている場合はrequirements.txtからopencv-pythonを削除すること!

(venv) user@user:~/venv$ pip install -r ../requirements_FACE01_UBUNTU.txt
Collecting dlib
  Using cached dlib-19.22.1.tar.gz (7.4 MB)
Collecting face-recognition
  Using cached face_recognition-1.3.0-py2.py3-none-any.whl (15 kB)
Collecting face-recognition-models
  Using cached face_recognition_models-0.3.0.tar.gz (100.1 MB)
Collecting numpy
  Downloading numpy-1.21.2-cp39-cp39-manylinux_2_12_x86_64.manylinux2010_x86_64.whl (15.8 MB)
     |████████████████████████████████| 15.8 MB 2.2 MB/s
Collecting opencv-python
  Using cached opencv_python-4.5.3.56-cp39-cp39-manylinux2014_x86_64.whl (49.9 MB)
Collecting Pillow
  Using cached Pillow-8.3.1-cp39-cp39-manylinux_2_5_x86_64.manylinux1_x86_64.whl (3.0 MB)
Collecting pyinstaller
  Using cached pyinstaller-4.5.1-py3-none-manylinux2014_x86_64.whl (1.5 MB)
Collecting pyinstaller-hooks-contrib
  Downloading pyinstaller_hooks_contrib-2021.3-py2.py3-none-any.whl (200 kB)
     |████████████████████████████████| 200 kB 2.2 MB/s
Collecting PySimpleGUI
  Downloading PySimpleGUI-4.47.0-py3-none-any.whl (365 kB)
     |████████████████████████████████| 365 kB 2.3 MB/s
Collecting tinyaes
  Using cached tinyaes-1.0.1.tar.gz (40 kB)
Collecting pyarmor
  Using cached pyarmor-6.7.4-py2.py3-none-any.whl (2.3 MB)
Collecting PyQt5
  Using cached PyQt5-5.15.4-cp36.cp37.cp38.cp39-abi3-manylinux2014_x86_64.whl (8.3 MB)
Collecting Click>=6.0
  Using cached click-8.0.1-py3-none-any.whl (97 kB)
Requirement already satisfied: setuptools in ./lib/python3.9/site-packages (from pyinstaller->-r ../requirements_FACE01_UBUNTU.txt (line 7)) (56.0.0)
Collecting altgraph
  Using cached altgraph-0.17-py2.py3-none-any.whl (21 kB)
Collecting PyQt5-Qt5>=5.15
  Using cached PyQt5_Qt5-5.15.2-py3-none-manylinux2014_x86_64.whl (59.9 MB)
Collecting PyQt5-sip<13,>=12.8
  Downloading PyQt5_sip-12.9.0-cp39-cp39-manylinux1_x86_64.whl (328 kB)
     |████████████████████████████████| 328 kB 1.9 MB/s
Using legacy 'setup.py install' for dlib, since package 'wheel' is not installed.
Using legacy 'setup.py install' for face-recognition-models, since package 'wheel' is not installed.
Using legacy 'setup.py install' for tinyaes, since package 'wheel' is not installed.
Installing collected packages: PyQt5-sip, PyQt5-Qt5, pyinstaller-hooks-contrib, Pillow, numpy, face-recognition-models, dlib, Click, altgraph, tinyaes, PySimpleGUI, PyQt5, pyinstaller, pyarmor, opencv-python, face-recognition
    Running setup.py install for face-recognition-models ... done
    Running setup.py install for dlib ... done
    Running setup.py install for tinyaes ... done
Successfully installed Click-8.0.1 Pillow-8.3.1 PyQt5-5.15.4 PyQt5-Qt5-5.15.2 PyQt5-sip-12.9.0 PySimpleGUI-4.47.0 altgraph-0.17 dlib-19.22.1 face-recognition-1.3.0 face-recognition-models-0.3.0 numpy-1.21.2 opencv-python-4.5.3.56 pyarmor-6.7.4 pyinstaller-4.5.1 pyinstaller-hooks-contrib-2021.3 tinyaes-1.0.1
(venv) user@user:~/venv$
まとめ
以上で環境設定は終わりです。非常に簡単です。
最後までお読み頂きありがとうございました。